

What Size Should A Photoshop Texture Pattern Be
Barry Haynes and Wendy Crumpler show you how to create interesting texture effects using Fill layers along with adjustment layers and Blend modes, Texture channels, the Texturizer filter, and the Pattern Maker.
Like this commodity? We recommend
Textures and Patterns in Photoshop CS
At that place are many ways to create and integrate patterns and texture in Photoshop. Once you lot start to play with some of the possibilities, you'll discover it so much fun it's difficult to stop and become back to work. I'll have you through several of the options here. During this do, exist sure you proceed your History palette handy to check the state of your file equally you make changes. Information technology will aid you determine which furnishings you really like.
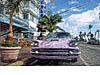
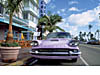 Figure ane The original photo of the Packard.
Utilize a Pattern Overlay Result
Step 1: The simplest and quickest way to add some texture to your file is to use a design overlay from the Layer Styles menu. Download the Packard paradigm (Packard.psd) and bring upwardly the Layers palette (F10 with ArtistKeys). Double-click on the Background layer and rename information technology Packard. Use the Crop tool (C) to crop off the copyright notice, then choose File/Save As and save this every bit PackardLayers. Click the Add together Layer Way icon (the start ane) on the bottom of the Layers palette and choose Pattern Overlay to apply this style to the layer. Choose the first grayscale pattern, then modify the Blend mode pop-up to Soft Lite. The advantages to adding texture this way are speed and connection to the layer itself. If you motility the layer the effect goes with it. On the disadvantage side, it's not as flexible or as editable equally some of the other methods. You tin discard this effect now by dragging the word "Effects" to the Trash icon on the Layers palette.
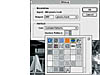
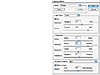
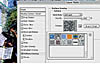 Figure 2 Step i: Click the outset grayscale pattern and alter the manner to Soft Light when you create the Pattern Overlay. Make sure yous take clicked on the proper noun Design Overlay to come across all the options available.
Use a Blueprint Fill Layer
Pace 2: A Blueprint Fill layer gives yous the speed of a layer style, but with more than flexibility. Click the Create New Fill or Aligning Layer icon (the quaternary i) at the lesser of the Layers palette and choose Design from the menu to add a new fill layer higher up the Packard layer. When the Pattern Fill dialog appears, click the Selection pointer beside the design swatch to bring up the Pattern presets, then click that Choice pop-upwardly and elevate downwardly to the Artist Surfaces presets. Load these by appending them to the electric current fix. Use the Pattern Presets pop-up to view the patterns by Small List, which makes finding the right one easier. Choose the Parchment texture and click OK to create the layer. Set the Opacity of the layer to seventy% and choose Soft Calorie-free equally the Blend style. I find that when adding texture, the Blend modes that I utilize about ofttimes are Soft Light and Overlay, but don't feel that y'all have to stick with those choices. Multiply, Color Burn, and Darken may besides be attractive, and if you lot are using a fill that has color every bit well, try all the modes to bank check their effects.
 Effigy 3 Stride 2: Creating a Pattern Fill layer.
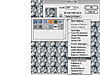 Figure 4 Step 2: Load the Artist Surfaces textures past appending them to the default set.
 Effigy 5 Step ii: Using a Blueprint Fill layer, you tin speedily try out other patterns.
Step three: The reward of using a Fill layer (as well as a layer style) is you can quickly preview and change the fill. Double-click on the Blueprint Fill layer thumbnail to bring up the options and again click on the Presets pop-up to bring up the swatches. Make sure the dialog box is situated so you can see most of your image. Now, click a different pattern swatch and picket the epitome automatically update to show your choice. Attempt several dissimilar swatches, but choose the Heavy Weave pattern and click OK to close the dialog box. With Soft Light at 70% this pattern works well, just yous may feel that the texture is a little likewise fibroid to be realistic. So, Shift-Choice-double-click the layer thumbnail or choose Blending Options from the Layer palette menu to bring upward the Layer Manner dialog and do some advanced blending. At the bottom of the Advanced Blending area of this dialog is a powerful feature that has been in Photoshop for a long time. At that place are two sets of slider bars that are very cool—This Layer, which allows y'all to remove some of the pixels in the 0–255 range from the active layer, and Underlying Layer, which allows you to specify the pixels from the composite of all the layers that lie below this layer that volition definitely be in the composite. In the Blend If section of the dialog box, utilize the This Layer slider and motility the left triangle to the right until information technology'southward at about 5. This subtly takes out the darkest pixels of the Pattern Fill layer and softens the effect. Zoom to 100% to see more than clearly which pixels are blended away here. Click OK in the Layer Style dialog, then double-click the layer name and rename this layer Heavy Weave.
Diffusion Dither Bitmaps and MezzoTint Patterns
Footstep 4: Turn off the Heavy Weave layer by clicking its Eye icon. Use Image/Indistinguishable (F5 with ArtistKeys) and click the Merged Layers Only box to duplicate just the Packard layer. Now choose Prototype/Style/Grayscale and so Image/Way/Bitmap, and click OK to the Flatten Layers question if you get it. You will get a dialog box that has a pop-up with several options. Choose Diffusion Dither and click OK. Zoom the paradigm in to 100% considering improvidence dithers don't look right unless the image is seen at 100% or closer. A diffusion dither bitmap is an image fabricated up of just black and white dots; there are no grays. The Bitmap mode contains ane bit of data for each pixel; information technology is either on or off, blackness or white. These images are very meaty, which is useful for the Web and multimedia. A regular grayscale image contains 8 bits per pixel, so each pixel tin can have 256 different gray values. Diffusion dithers are very universal considering you lot can display them on whatsoever figurer monitor and print them on any printer that can print black dots. Now cull Command-Z to undo the improvidence dither.
Step 5: Next we'll create a bitmap file, merely this time using a custom design the same size as the file. Choose Select All (Control-A), then Edit/Re-create, and finally File/New (Command-Northward) to become a grayscale file the same size as the other Packard files. Earlier clicking on the OK button in the New dialog box, name the file MezzoTint and make sure that the Background Contents pop-up is set to White to fill this new file with white. Choose Filter/Noise/Add Racket and add 100 of Gaussian noise. This is sort of a mezzotint pattern. Press Command-A again to select all of the grayscale pattern. Now choose Edit/Ascertain Pattern to brand this a new blueprint Photoshop tin utilize. The blueprint should be named MezzoTint. Get back to the PackardLayers copy and choose Mode/Bitmap again. This time pick the Custom Blueprint selection in the pop-up, click the pattern swatch, and then cull the new pattern in the bottom of the card. That will be the MezzoTint design you just defined. Press Return to go out of the dialog and you volition see the image with this MezzoTint pattern. Choose Select/All, go to Edit/Re-create, and and then apply the Window bill of fare to switch to your color PackardLayers image. Turn on the Middle icon for the Heavy Weave layer and do an Edit/Paste to create a new layer. Double-click on the name of this new layer to rename it MezzoPattern. Zoom in to 100%.
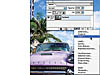
 Effigy half dozen Pace v: Choose the MezzoTint design you just created from the Custom Blueprint pop-upwardly.
Step half dozen: With the MezzoPattern layer active and the Eye icons on for all three layers, alter the Opacity to 40%. Alter the Blend style of the MezzoPattern layer in the Layers palette to Multiply to make the black dots more black and drop out the white parts of the pattern. It volition also bring out better color saturation in the nonblack areas, and you will meet better colors from the original Packard. Cull File/Salve to update your file. Using the custom pattern the same size equally the file means that the blueprint did not have to tile and there are no seams or annoying repetitions in the pattern. The disadvantage to a bitmap is that it is but black and white, therefore adjusting tonal values is not an selection except for changing the opacity.
 Figure vii Stride 6: Here'southward a section of the file with the Mezzo Design layer at 40% Opacity.
Streaked Patterns
Step 7: Now we will create another design and add together some more layers to give y'all other options with this prototype. At this point, you may find it easier to work in Full Screen mode, so type F at present if you are not already using the full screen. Retrieve to use the Window carte if yous demand to switch images. When nosotros add together the next layer, we want it to be added above the MezzoPattern layer, then click on the MezzoPattern layer to make it the active layer, but turn off the Eye icon for this layer and the Heavy Weave layer. Click the New Layer icon to make a new blank layer, and so use Edit/Fill (Shift-Delete brings upwards this dialog) and use Blueprint. Choose the MezzoTint pattern you created and fill at 100% Opacity in Normal mode. Use the Rectangular Marquee tool (M) to make a long, skinny selection on the left edge of this layer the full superlative of the file. This rectangle should exist nearly 1/4 inch wide. Now use Edit/Transform/Scale and grab the center-right handle and drag information technology across the screen to the right side of the window. This stretches out the dots within this 1/4-inch selection and gives you lot a streaking pattern. Printing Enter or Render to cease the scale process and Command-D to deselect the area. Double-click the layer proper name and rename the layer Streaks. Printing Command-Pick-0 to zoom to 100%. Alter the Blend mode of this layer to Linear Burn to remove all the white pixels. At present change the Opacity to 40%, and the black steaks turn greyness. Save your file (Command-S).
 Figure 8 Pace 7: Your long, skinny choice on the left edge should await something like this.
TIP
When you use Edit/Fill on a blank layer, be sure Preserve Transparency is not checked, and then the layer can have pigment.
The Texturizer Filter
Step 8: Another built-in texture feature of Photoshop is the Texturizer filter. For this part of the exercise nosotros'll use a copy of the Packard itself then elevate the Packard layer to the New Layer icon to make a copy of information technology. Double-click the layer proper noun to name this layer Texturizer, and turn off the Center icons for all the other layers. Now go to Filter/Texture/Texturizer. Use the Textures pop-up to effort the iv default textures, then press the Option pop-upwardly and go to Load Texture. Navigate to the Photoshop CS Presets folder and observe the Textures presets. Whatsoever .psd file inside that folder will now be available for you to use with the filter. I used the Strands file, but yous don't have to terminate your search for texture with the files in this folder. A .psd file is all you need, and it doesn't matter where information technology's located. If you lot've run art filters in previous versions of Photoshop, you'll see the dialog has changed. The art filters are all accessible from this one dialog, which is chosen the Filter Gallery. Now, instead of only being able to run one filter at time on a layer, you tin can run a combination of filters, then modify their stacking order, settings, and Center icon states while however in the dialog. You lot'll see more of this in our side by side example.
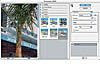 Figure 9 Footstep 8: The Photoshop CS Filter Gallery dialog gives you options to combine several filters at one fourth dimension. This is what the dialog looks like when yous run a single filter.
 Figure 10 Pace 8: Here's the upshot of using a Zebra blueprint I establish in the Presets/Patterns/ImageReady binder.
 Effigy 11 Footstep eight: An unexpected and interesting event using a colour photograph of a minor boy in a greatcoat with the Texturizer filter.
Lighting Furnishings
Step 9: Drag the Packard layer to the New Layer icon to duplicate the layer, and then double-click the proper name and rename this one Lighting Effects. Turn off the Eye icons for any layers that are to a higher place this layer. At present go to Filter/Render/Lighting Furnishings. Utilize the default settings, merely alter the type of light from Spotlight to Omni and widen its spread a scrap by pulling out on the handles of the circle surrounding the light. Lighting Effects tin can be great for enlivening a department of your photo or for adding special effects, but when you add a texture channel it's also great for creating an impasto or embossed await. Cull the Blue aqueduct for the texture aqueduct and click OK. You may need to play with this filter awhile before you experience comfortable with all its many options, only it's a cracking add-on to your furnishings arsenal. Here once again, you are not limited to only the RGB channels to use as textures, but y'all can employ whatsoever Blastoff aqueduct that you have created for that document.
 Effigy 12 Stride 9: Use these settings...
 Effigy 13 Step ix: ...to create this consequence.
The Design Maker
For this part of the practise we're going to work with the Pattern Maker feature introduced in Photoshop 7. I think this feature volition exist used most past Web designers, merely it's so much fun to utilise that, whether you lot need to create patterns or not, you lot may find yourself spending hours like a kid with crayons. There are two unlike ways to create your patterns, and nosotros'll do information technology both ways here.
Create Tiles Using an Epitome
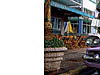
Step 10: In one case over again, elevate the Packard layer to the New Layer icon on the Layers palette to indistinguishable information technology and name this layer My Design. Turn off the Eye icon for the Lighting Furnishings layer, and then become to Filter/Design Maker. You lot'll become some other of those very big dialog boxes with lots of confusing options. Don't worry, this i's really quite simple. On the upper-left side are iii familiar tools: the Marquee, the Zoom tool, and the Mitt tool. Utilise the Marquee and drag a small rectangle in the expanse that you lot want to use equally a pattern. I chose the legs of the folding chairs. Now click the Generate push. The layer is filled with the pattern you lot merely created and a pattern tile appears at the bottom-right of the Design Maker window to testify yous what a single tile looks similar. The default settings work well for about tiles. If you think the edges are likewise prominent and noticeable, you can heighten the Smoothness setting, and and so press Generate Again or Command-G. If you are not seeing details you wanted from the sample you used, increment the Sample Detail setting. Changing these settings causes Photoshop to demand more time to generate the pattern, so don't use the college settings unless you lot really need them. Another tactic y'all tin can try is changing the tile size. You can blazon in any number for the width and height of the tile, or click the Utilise Image Size button to create one tile that is the size of the current epitome. This also may take a fleck of fourth dimension to generate, but information technology ensures that at that place will be no seams in your layer. Later y'all take generated several tiles, become to the Preview area of the dialog box and choose Prove Original rather than Show Generated. Your original prototype reappears and you tin can select a different area to use as a tile. Marquee a small area of the palm tree branches or the flowers in the planter box on the left and Generate Over again.
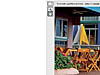 Figure xiv Pace 10: This area with the chair legs gave me interesting angles and negative infinite for patterns.
Review, Preview, and Save Patterns
Footstep 11: In the Tile History area, you lot'll observe a footling control bar that tells you the number of the current tile and how many tiles you have created during this use of the Design Maker. Yous can click the forward and back arrows to review the patterns you lot've generated one by one. You tin jump to the beginning of the list using the second icon in the control bar or leap to the end of the list using the next to the last icon. As you lot switch between the patterns, the large window will preview the tiled pattern in the image if Update Pattern Preview is selected. For faster scrolling you can uncheck this box. If y'all come across a pattern that yous're sure you don't want, you can click the Trash icon to delete it, and if yous come to ane that yous might want to use for other purposes, click the Presets icon on the far left of the control bar to proper name your pattern and add together it to the current presets. Recall to resave the presets from the Presets Manager if you lot desire to keep your patterns permanently. When you lot've created and saved all the patterns you want, choose one to fill this layer by clicking OK.
Create Patterns from the Clipboard
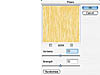
Pace 12: The 2d manner to create a pattern using the Pattern Maker is to use a option from the clipboard. In this instance, nosotros're going to create a small file with texture and color that might work and apply it for our pattern. Turn off the Eye icon for the My Pattern layer, and then go to File/New and create a new RGB file 400 pixels past 400 pixels. Choose a squeamish, warm ivory color for your foreground color and use Selection-Delete to fill with this color. Go to Filter/Noise/Add Racket and use Gaussian and Monochromatic of about 10%. Adjacent go to Filter/Brush Strokes/Crosshatch and employ xx as the Stoke Length, x for Sharpness, and one for the Force. When you have run both filters, utilize Command-A to select all of the file and Command-C to copy. Switch back to the PackardLayers file, click the Packard layer to activate it, and so click the New Layer icon on the bottom of the palette to create a new, blank layer. Name this layer Crosshatch, then use Command-Option-Shift-Ten to invoke the Pattern Maker over again. Yous may be asked if you desire to convert the source data. Click OK to this dialog or yous will non be able to apply the contents of the clipboard when the Pattern Maker opens. The preview volition be bare until you lot click Apply Clipboard as Sample and generate the new pattern. If you feel the preview shows seams, click Use Image Size and generate again. Click OK when you are happy with the pattern to fill the layer. Set the Blend mode of the Crosshatch layer to Color Burn.
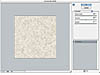 Figure xv Step 12: Utilize these settings for the Crosshatch filter: Stroke Length, 20; Sharpness, x; and Strength, ane.
TIP
Patterns with Transparency
You aren't limited to creating patterns that completely comprehend the layer. If you make a selection from a layer with locked transparency, your pattern will also have transparent regions. Very cool.
Fibers
Footstep thirteen: Photoshop CS added a new filter called Fibers that creates textures using the foreground and background colors. Low settings give you a sort of gently creased material wait, higher settings look like wood or marble. I've plant these to be interesting equally backgrounds for pieces, a little trickier when calculation texture over existing images. For this paradigm, I suggest you lot work with adequately subtle colors (I used a tan foreground and a gold groundwork). Turn off the Eye icons for all layers except the Packard. Click the Create a New Layer icon on the lesser of the Layers palette, then use Selection-Delete to fill that layer with the foreground colour. Information technology doesn't affair what color the layer starts out, the filter will fill up any existing pixels with the design. Brand certain you have called the color swatches you want, so use Filter/Return/Fibers. Move the sliders until you accept a await you like, then click OK. Now double-click the layer name and rename this layer Fibers. Depending on the colors you chose to work with, you may find Multiply, Color Burn, Soft Light, or Overlay work for your blend mode. You might likewise want to reduce the opacity a bit.
 Effigy sixteen Step 13: Starting time your pattern with these middle values, but motility the sliders to observe other looks. The Randomize push uses these values merely shifts the blueprint each fourth dimension you lot click.
Fourth dimension to Play with Layers and Options
Step xiv: Now you have several layers and effects that you can adapt until you get the terminal image you want. Call up that yous tin can turn off whatever layer past clicking on its Centre icon. Testify the Layer Comps palette, then apply the Layers palette to play with Opacity, Alloy mode, This Layer slider, and the Underlying Layer slider in the Layer Style dialog for the layers until you get a combined consequence you like. Call back, the Underlying Layer slider bar in the Layer Way dialog forces pixels of lower layers into the composite. One time yous notice a version that pleases you, click the Create New Layer Comp button on the bottom of the Layer Comps palette. In a chore like this where y'all are prototyping effects and take lots of possibilities, the Layer Comps palette is invaluable.
 Figure 17 Step 14: The Layer Comps palette really helps y'all decide which effects y'all want to proceed and also what you did to achieve the result. For this comp, some of the aforementioned layers are visible, but the Blend mode for the Fibers layer has changed. Glad I didn't have to remember that all by myself.
Before Photoshop had the Layer Style dialog and earlier it even had built-in layer effects, it had the ability to create millions of interesting furnishings using this type of technique of stacking layers, and then running filters and changing the Alloy modes of each layer to create many of the effects that the current Layer Style dialog does in a more automatic manner. Play with these features of Photoshop to prototype future furnishings that become the latest in your ready of Photoshop surprises. I'grand sure you tin come with something that looks great and nobody has ever tried earlier. The number of effect combinations you can create is unlimited. Take FUN!

What Size Should A Photoshop Texture Pattern Be,
Source: https://www.peachpit.com/articles/article.aspx?p=170987
Posted by: mooreladjecamis.blogspot.com
0 Response to "What Size Should A Photoshop Texture Pattern Be"
Post a Comment